3-2-1 Vocabulary: Learning Filmmaking Vocabulary by Making Films


- Preview |
- Standards |
- Resources & Preparation |
- Instructional Plan |
- Related Resources |
- Comments
Overview
Students are introduced to the vocabulary of film as they go through the process of creating a short original film. This unit provides instruction on key aspects of digital video filmmaking: plotting, script, storyboarding, camera work (shots, angles), and editing (transitions, title, credits, visual effects, sound effects, etc.). Once students are familiar with the techniques and terms introduced in this lesson, they can apply their new skills to bring other content areas to life through filmmaking. The activities involved in filmmaking can be particularly helpful to English language learners (ELLs) because the visual component helps ELL's consolidate their knowledge.
Featured Resources
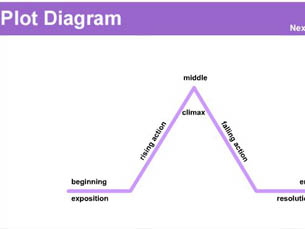
Plot Diagram Interactive: Use this interactive tool for planning the basic structure of the script.
Crossword Puzzles Interactive: This interactive tool can be used as either a practice assessment or final evaluation tool to assess students’ knowledge of filmmaking terminology.
From Theory to Practice
Common Core Standards
This resource has been aligned to the Common Core State Standards for states in which they have been adopted. If a state does not appear in the drop-down, CCSS alignments are forthcoming.
State Standards
This lesson has been aligned to standards in the following states. If a state does not appear in the drop-down, standard alignments are not currently available for that state.
NCTE/IRA National Standards for the English Language Arts
- 4. Students adjust their use of spoken, written, and visual language (e.g., conventions, style, vocabulary) to communicate effectively with a variety of audiences and for different purposes.
- 6. Students apply knowledge of language structure, language conventions (e.g., spelling and punctuation), media techniques, figurative language, and genre to create, critique, and discuss print and nonprint texts.
- 8. Students use a variety of technological and information resources (e.g., libraries, databases, computer networks, video) to gather and synthesize information and to create and communicate knowledge.
- 12. Students use spoken, written, and visual language to accomplish their own purposes (e.g., for learning, enjoyment, persuasion, and the exchange of information).
Materials and Technology
- Digital video cameras (one camera per group of 3–5 students) capable of communicating with iMovie or Windows Movie Maker (some mini DV cameras will not upload files into these programs)
- Digital still cameras (optional, for use with Celtx software for creating a storyboard)
- Computers (one per student or one per group) with video editing software (iMovie or Windows Movie Maker) and printing capability
- Tripods for video cameras (recommended)
- LCD projector or document projector
- Smartboard or chart paper
Printouts
Websites
Preparation
- Pretest your video cameras to make sure they will communicate with iMovie or Windows Movie Maker. Some mini DV cameras will not upload files into editing programs. It is best to use either a camera that records on either a hard drive or mini DV tapes.
- If you plan to use Celtx for scriptwriting, download the free program and go through the tutorials at http://celtx.com/walkthru/.
- If necessary, schedule access to student computers for Sessions 2, 3, 5, 6, 9, and 10. If you use Celtx for Storyboarding, you will also need computers for Session 7.
- Familiarize yourself with the materials on the following websites:
- Let’s Make Movies: Extras—Support Materials (specifically the Movie Project Planning Sheet and Storyboards)
- Internet Movie Database (IMDb) Movie Terminology Glossary
- Glossary of Film Terms
- The “Grammar” of Television and Film
- Tips on Shooting Sequences
- Camera Shots Lesson
- Types of Video Transition
- Let’s Make Movies: Extras—Support Materials (specifically the Movie Project Planning Sheet and Storyboards)
- Review the terms on the Filmmaking Vocabulary Words printout.
- For each student, make a copy of the Filmmaking Vocabulary Words printout, Types of Shots, Types of Angles, Sample Script, Movie Project Planning Sheet, and Sample Storyboard, and Storyboards (optional).
- Familiarize yourself with the digital video editing program you will be using. For Windows Movie Maker, see Digital Video Editing Using Windows Movie Maker and Tips for Using Movie Maker.
For iMovie, see Tech-Ease: Video Tutorials. On this site, first find the link for your version of iMovie. For example, on a Mac with the Snow Leopard operating system, you would be using iLife 09; select iMovie 09. If you are using an older version equipped with iMovieHD, go down to the iLife 06 section and click on iMovie HD. The newer versions appear as a star-shaped icon on your computer. The HD version appears as a clapboard icon. - Familiarize yourself with the ReadWriteThink tools used in this lesson.
Plot Diagram
Crossword Puzzles
Student Objectives
Students will
- Learn the basic terminology of filmmaking by creating their own films and by reviewing other students’ films
- Develop collaborative skills by working in small groups
- Learn how to use a variety of tools to create and edit digital video
Session 1: Vocabulary of Film
Note: You might wish to choose examples from the following websites for this Session:
- The “Grammar” of Television and Film
- Digital Video Editing Using Windows Movie Maker
- Tech-Ease: Video Tutorials
- Tips for Using Movie Maker
- Let’s Make Movies: Films
- Distribute copies of the Filmmaking Vocabulary Words printout, Sample Script, and the Types of Shots and Types of Angles example sheets to each student.
- Review parts of the camera and tripod with students, modeling with a real camera and tripod. Have students draw and label their own picture for their notes.
They should know at least the following terms: lens, lens cap, zoom button, record button, and viewfinder. They should also know where to attach their upload cables: In Windows this will be called a capture cable, and in Mac the cable is called a firewire.
Review with students the following tripod terminology: shoe, tripod head, leg locks, pan-handle (the handle used to pan from side to side or up and down). - Display the Types of Angles sheet, using either an LCD projector or a document projector. Ask students if they can provide examples of shots using these camera angles from movies or television shows they have seen.
- Display the Types of Shots sheet using the LCD projector or document projector. Display some examples (chosen previously from the Let’s Make Movies: Films site or other sources) and ask students to identify various shots and angles used in the films. After they identify each shot, ask them how that shot contributed to the meaning.
- Ask students to think about why they might use a particular shot or angle, and review each shot as it is mentioned. The following questions can be used to guide the discussion:
- What would be the best shot to use if you wanted to show where the action was taking place? (establishing shot)
- What shot would you use if someone was talking and you wanted to show expression? (close-up)
- What shot would you use if someone was scared and you wanted to show their wide eyes? (extreme close-up)
- What shot would you use if you wanted to show people entering a scene, or to show some action? (wide shot)
- What shot would you use if you wanted to show a person talking and gesturing? (medium close-up)
- What would be the best shot to use if you wanted to show where the action was taking place? (establishing shot)
- Have students form small groups or assign students to groups. Each group should have 3–5 students, depending on number of cameras. Instruct the groups to shoot practice footage using each of the above shots, using the Sample Script. Remind students that since they are filming without expensive external microphones they should always shoot dialogue as either close-ups (including extreme close-ups) or medium shots.
- Film an establishing shot (also called wide shot) with Person A standing in a location (the location in the Sample Script is a courtyard).
- Film a long shot of Person B entering the location.
- Film a medium close-up of Person A, saying “Do you want to buy a dog?”
- Film a close-up shot of Person B pondering the question, and then asking, “Does it bark?”
- Film an extreme close-up of Person A, rolling his eyes and saying, “Of course it barks!”
- Film another long shot of Person B walking away, looking confused.
- Film an establishing shot (also called wide shot) with Person A standing in a location (the location in the Sample Script is a courtyard).
Note: Remind students to save their sample shots to upload into computers for practice editing in Session 2.
Sessions 2 & 3: Learning to Edit With Movie Software
Note: This process may take from 60 minutes to 2 hours, depending on how much practice time you provide for your students.
- Using a projector and sample footage, use Windows Movie Maker or Mac iMovie to demonstrate the following editing techniques to the class:
- Adding titles and credits
- Adding visual effects, using the Effects tool
- Adding music and sound effects
- Cutting and cropping clips
- Transitioning between clips.
- Adding titles and credits
- Have students work in their small groups to upload the footage they shot during Session 1 and practice these techniques using their own clips.
- After students have finished editing, ask for volunteers to show their videos. Discuss the use of titles, credits, effects, transitions, music, and sound effects in their movies.
Session 4: Ideas for Your Own Movie
- Explain that students will be making a movie whose theme is “How to Make a Movie.” The film vocabulary they have learned “in action” will now become part of their movie. Invite students to choose from the following general topics: types of shots, types of angles, the use of a camera, the use of a tripod, or aspects of digital editing. They can choose to focus on a specific aspect of their topic, such as, Why would you use a high or low angle? When would you use a Dutch/canted angle? How do you upload your footage to a computer? Each small group should choose a different topic. Make sure students understand that they will be required to illustrate appropriate filmmaking vocabulary words in their movies.
- In a large-group discussion, have students share their ideas about what needs to be included under each topic. Write down their ideas on an idea web created on whiteboard or piece of chart paper. Then ask student groups to choose one of the topics to use in their film. For example, one group may decide to make their movie about why you would use different shots; another group might illustrate the reasons for using different angles. Students may also choose to shoot a short scene—like the “Want to Buy a Dog” scene—and then include a “director’s” discussion of why they chose particular shots.
- Distribute copies of the Movie Project Planning Sheet to students. Display the planning sheet using a projector and demonstrate how to fill it in.
- Have students work in their small groups to plan their “how to” scripts using the planning sheet.
Session 5: Story Planning
Note: For this session, students will need their planning sheets from Session 3.
- Have students access the interactive Plot Diagram tool and conduct a Shared Writing session to demonstrate how to use the site. Use your example planning sheet from Session 3 to plan a beginning, middle, and ending of your “how to” story.
- Have students work in their small groups to create their movie plots using the Plot Diagram tool on their own computers.
- Instruct students to print out their completed plot diagrams. They can then begin to outline scenes for their movies.
Session 6: Scriptwriting
- If students will be writing their scripts with the aid of Celtx, begin the session with a demonstration of the software, using appropriate clips from tutorial videos and explanations provided on the website. Alternatively, you can distribute copies of the Sample Script to serve as a model, and have students write or type their scripts.
- Using your planning sheet and plot diagram from the previous sessions, participate in a shared writing session with students, working together as a class to create one page of a script.
- Discuss the script/page ratio: one page of script is approximately one minute of film. Explain that ideally their films should be from 1 1/2–4 minutes, which means that their scripts should be a maximum of four pages long: one page for beginning, two pages for middle, and one page for the end.
- Have students work in their small groups to draft a script for their movie. Circulate among the groups to offer assistance or suggestions where needed.
- Have students decide who will play the parts in their movie, and practice reading their scripts as Readers’ Theatre, applying fluency filters. Explain that critiquing with fluency filters means assessing how well the reader portrays the intended meaning in the context of the film. With this goal in mind, they should attend to gestures and facial expressions, tone of voice, and volume (Too loud for meaning? Or too soft to be heard?).
Session 8: Filming
Note: Prior to Session 8, students should gather any props and costumes they wish to use in their movies. Remind them also to bring their scripts and storyboards to guide their filming. Each group will need a digital video camera. Tripods are recommended.
- Review the parts of the camera and tripod (if using).
- Have students work in their small groups to film their scripts. While students are filming in small groups, facilitate their work. Reinforce the usage of filmmaking vocabulary when you hear it, and suggest proper terminology where appropriate. For example, if a student wants to film a Dutch Angle but says “Let’s do a sideways shot,” ask what this shot is called.
Session 7: Storyboard Writing
Note: Prior to Session 7, decide whether students will be using Celtx or the Storyboards printout for storyboarding, and choose the appropriate options from the supplies and instructions below. To demonstrate storyboarding in Celtx, you will need to have sample image files of the locations and shots you plan to include.
- Make sure students have their copies of the Types of Shots and Types of Angles handouts. Review the contents of the handouts with students and remind them to refer to this information as they work on their storyboards.
- Introduce the storyboard option on Celtx and have students access the software to plan their shots. Alternatively, you can print and distribute copies of the Storyboards form. Using their scripts, students should now begin to plan their shots, referring back to structure of the film they created in the first two sessions. Have students examine their new scripts and ask the following questions.
- Look at your very first scene. What is your establishing shot?
- Still looking at that scene, are there any other shots you could use? For example, are there any actions you would want to zoom in on with a medium shot?
- Does the script have any dialogue? Remember that dialogue should be filmed in medium or close-up shots.
- Is there any strong emotional content? Emotional scenes should be shot close-up. Are there any extreme facial expressions? These should be extreme close-ups.
- Look at your very first scene. What is your establishing shot?
- Demonstrate storyboard planning as a whole-class activity. Project the Sample Storyboard on a projector and review. Then project the image of the blank storyboard so you can fill it in.
- If students are using the printed Storyboards forms, participate in a shared writing session to plan the first few scenes and illustrate the shots using stick figures. (See Sample Storyboard).
- If you are using Celtx, click on the Storyboard link under Project Templates. For each segment of the storyboard, type in the details about the shots and actions and then upload photos of the chosen locations and shots.
- Have students work in their groups to create storyboards for their movies. Students using Celtx will need to take their scripts (with the shot decisions written on them) to their locations and take still photos illustrating the chosen shots. They should then import the appropriate still photos into Celtx and print out their storyboards.
Sessions 9 & 10: Digital Editing
Note: Editing could take place over either one or two sessions. If you choose to have the students critique each other’s rough-cut films, you should plan on at least two sessions. Otherwise, students may be able to finish editing in one session, providing they have less than two minutes of footage.
- Using the materials and instructions from Session 2, review techniques for editing a film.
- Have students work in their small groups to edit their films. Encourage them to use their scripts and storyboards to guide their work.
- Circulate among the groups to help students with technical and organizational questions. Once again, reinforce the use of appropriate filmmaking vocabulary.
- As an optional step, when students are finished with a rough cut, have each group watch one other group’s movie (on that group’s computer). As they watch each other’s rough cuts, they should make note of any continuity errors or other places where meaning needs to be clarified.
- Have students return to their own computers and continue editing their movies to create the final cut of their movie, making changes to reflect their classmates’ critique.
Session 11: Premiering the Masterpieces
- Show each group’s completed video to the class.
- After each film, review the filmmaking vocabulary terms and how they were applied within the films.
- After each film, review all of the terms on the Filmmaking Vocabulary Words handout and discuss how they were applied within the film.
- Have students work in small groups and use the interactive Crossword Puzzles tool to elaborate on vocabulary definitions. Students should create clues (definitions) for the filmmaking terms they’ve seen displayed in the final films.
Extensions
- Have students burn their movies onto DVDs and use the interactive CD/DVD Cover Creator tool to design a cover for their movie.
- Use the filmmaking techniques learned in this unit to teach vocabulary in any content area (e.g., science, social students, mathematics, language arts). For example, students could create videos illustrating specific concepts in economics (supply and demand, opportunity cost, ethical business practices).
- Have students use digital video to create original stories, documentaries, commercials, or public service announcements (see MyTube: Changing the World With Public Service Announcements)
Student Assessment / Reflections
- Observe students’ interactions in whole-group settings and while working in small groups to evaluate understanding of filmmaking vocabulary.
- Evaluate students’ comprehension of filmmaking terms and small-group work through completed versions of the interactive Crossword Puzzles tool. Assess their definitions for accuracy by using the Filmmaking Vocabulary Words With Definitions.
- Use the Rubric for Filmmaking to evaluate students’ use of the language of filmmaking both during the process and in the actual films.
Add new comment